


If you are a current Salesforce customer, is your organization using Multi-Factor Authentication (MFA)? If not, now is the time to get ready because with the Spring ’23 release, Salesforce announced that automatic enablement of MFA for direct logins will occur over several phases throughout 2023.
Not sure what that means, or where to start? Let’s explore what MFA is and how to prepare, both from an administrator and end user perspective.
What is Multi-Factor Authentication (MFA) and Why Do We Need It?
Advances in technology continue to connect us, change how we work and play, and improve our lives. But that evolution comes with risks and rewards. Protecting your organization’s data from potential cyber threats and phishing attacks that come with advances in technology is critical. Salesforce is helping customers take that step by evolving authentication requirements to include MFA.
MFA provides an additional layer of security by requiring users to provide two or more ways to verify they are who they say they are. Upon logging in to Salesforce, users are required to identify themselves with something they know, such as a username and password for direct logins, followed by something they have, such as a code from the Salesforce Authenticator app on their mobile device.
Most of us use multi-step login and authentication processes to access tools like online banking websites and other apps all the time. We might go to a website, log in with our username and password, and then the site or app may ask for a second method to prove we are who we say we are, like an additional pin.
Salesforce’s MFA is no different; a user will be asked to provide a username and password, something they know, and a second verification method, something they have.
As a Salesforce Admin, How Do I Prepare for Multi-Factor Authentication (MFA)?
Salesforce will begin automatically enabling MFA throughout 2023, but we recommend taking control of that timeline by enabling it on your own sooner rather than later.
So, as a Salesforce Admin, where do you start? Before you begin rolling out MFA, determine which MFA method fits your organization’s needs. (If you’re not sure, our team of Salesforce consultants is happy to help!)
- The Salesforce Authenticator App is free and available on the Google Play or iOS Apple Store. When a user logs in, they will receive a push notification on their mobile device to verify their identity.
- Third Party Authenticator Apps generate unique, temporary verification codes based on the OATH TOTP algorithm.
- Security Keys are physical ways to create an additional layer of security to authenticate into your org.
- Built-In Authenticators verify identities with fingerprint, iris, facial recognition scan, or a PIN or password.
Once you decide which verification method makes the most sense for your organization, there are two ways to roll out MFA – (1) gradually to users in groups, or (2) to everyone all at once. Whichever option you choose, it is important that you have a well-planned change management strategy to include:
- Communications to build awareness of the change, ideally to include multiple communications beginning a few weeks in advance of the rollout.
- Training on MFA concepts and how to use recommended verification methods.
- Support materials such as frequently asked questions (FAQs) and scheduled office hours.
As a Salesforce Admin, How Do I Enable Multi-Factor Authentication (MFA)?
Depending on your rollout strategy, the steps will be different.
To roll out MFA for all users at once:
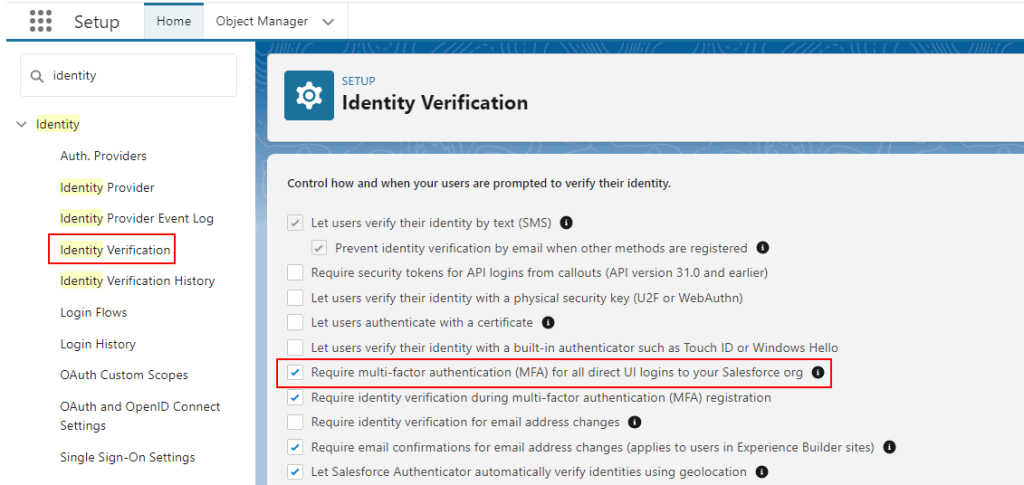
- Access the Setup menu, select “Identity” on the left sidebar, then select “Identity Verification.”
- Select “Require multi-factor authentication (MFA) for all direct UI logins in your Salesforce org.”
To roll out MFA by profile:
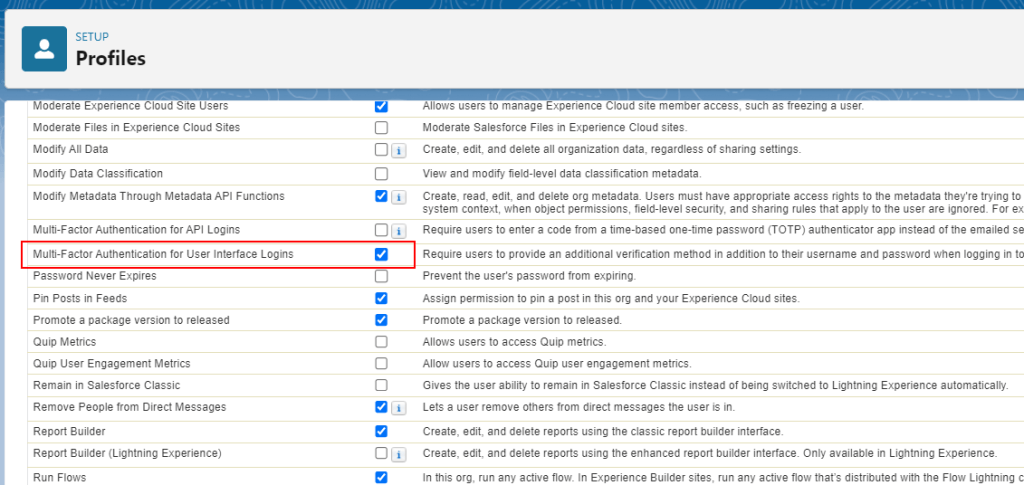
- Access the Setup menu, select “Profiles” under “Users” in the left sidebar, and select a profile.
- Scroll down and click on “System Permissions.”
- Under System Permissions, check the box next to “Multi-Factor Authentication for User Interface Logins,” and save the profile.
To roll out MFA using a permission set:
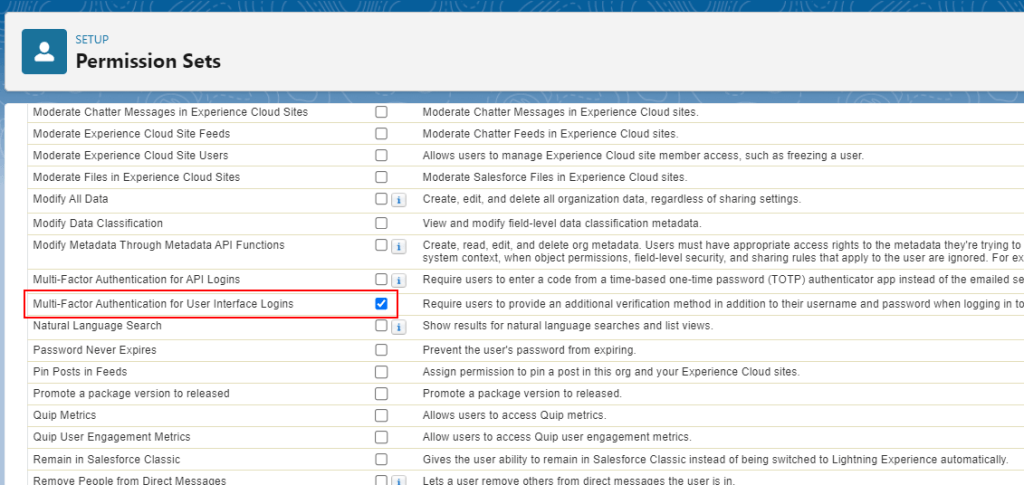
- Access the Setup menu, select “Permission Sets” under “Users” in the left sidebar, and click “New.”
- Name your permission set logically, such as, “Organization Name Multi-Factor Authentication,” add a description, and click “Save”
- Scroll down and click on “System Permissions.”
- Under System Permissions, check the box next to “Multi-Factor Authentication for User Interface Logins,” and save the permission set.
- Assign the permission set to users.
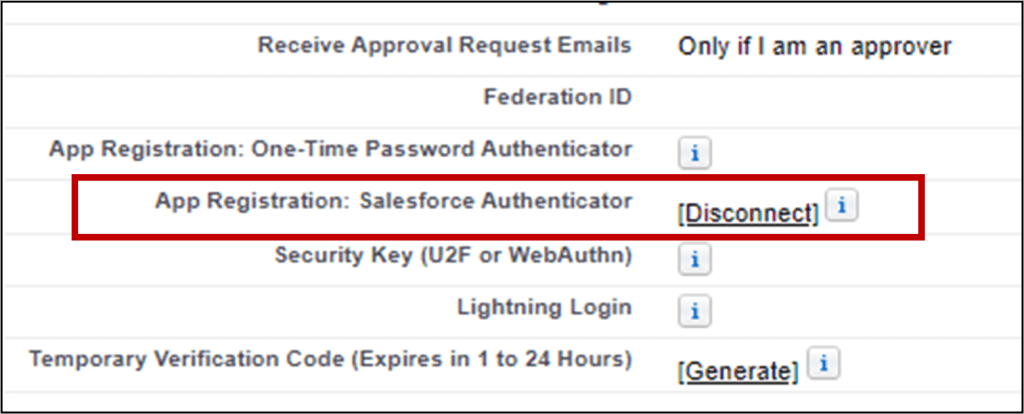
There may be cases where someone loses access to their authenticator, by replacing a lost phone for example. If a user’s second factor, something they have, changes, as an Admin, you can disconnect the original authenticator from the user’s account. Access the user record, look for “App Registration Salesforce Authenticator,” and click “Disconnect.” This will allow the user to reconnect with a new device.
As an End User, How Do I Use Multi-Factor Authentication (MFA)?
Once MFA has been turned on, you will be asked to take steps to add that extra layer of protection. Depending on which verification method your organization uses, your steps will be different. For the Salesforce Authenticator App:
- Download and install the Salesforce Authenticator app from Google Play or Apple App Store on your mobile device.
- Log in to Salesforce with your username and password on your computer.
- A “Connect to Salesforce Authenticator” screen will appear on your computer asking for a Two-Word Phrase.
- Open the Salesforce Authenticator App on your mobile device and click the “Add an Account” button.
- On the “Connect Salesforce Authenticator Screen,” enter the two-word phrase in the Salesforce Authenticator App, then click “Connect.”
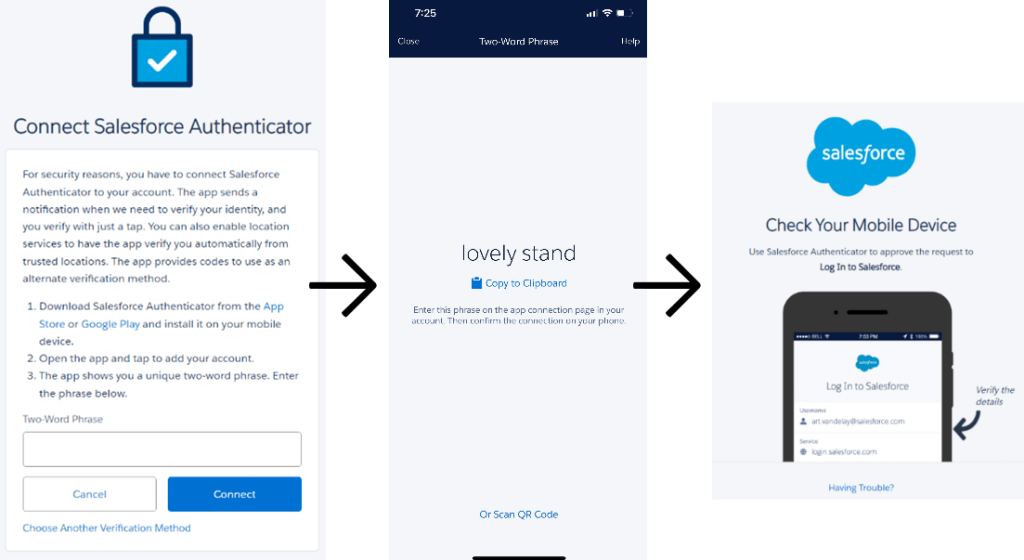
The next time you log in with your username and password, you will be prompted to go to the Salesforce Authenticator App to approve your login request. If you are unable to login with your Salesforce Authenticator App, reach out your Admin for support.
I Understand How Multi-Factor Authentication (MFA) Works, What’s Next?
If you’re an Admin and your Salesforce org does not have MFA enabled, we recommend getting ahead of Salesforce’s automatic enablement by coming up with a rollout plan now. Salesforce has a great set of resources to help you, including FAQs. Additionally, there may be use cases that warrant waiving this requirement, such as for user accounts for test automation tools, users assigned an Employee Community license, logins using a certificate service, and others. Waiving this requirement ahead of time is possible using a specific permission, click here for more information. But if you need help, to ensure everything runs smoothly, team up with a trusted partner like Higher Echelon to plan, communicate, train, and support your Salesforce users as you enable MFA.
Michele O’Brien is a 2x certified Salesforce Consultant with HigherEchelon, Inc. and has a passion for finding and sharing the latest and greatest Salesforce features.
Client Review: 5/5 ★ ★ ★ ★ ★
HigherEchelon’s team is extremely professional and high caliber. They are very knowledgeable on the Salesforce platform, while offering solutions to business problems. That’s a hard mix as most partners tend to be over indexed in one particular way. HigherEchelon knew how to leverage the platform to solve our business needs.
– Client, Financial Services Sector, public review on Salesforce AppExchange